
One of my thriftstore obsessions is wool sweaters, especially the cashmere variety. I dream of finding a stash of $1 cashmere sweaters to either 1) wear, or 2) felt/full and repurpose. To that end, I bring you the sweater pillow project. Not to be confused with other types of sweater pillows.
Materials:
At least two 100% wool/animal fiber sweaters
Thread
Pillow form or stuffing
Optional: Zipper or buttons
Sewing machine
Methods:
1. First, you want to felt your sweater(s). This will not work if your sweaters contain non-natural fibers or say “Superwash” on the label. Dry clean only, however, means that the manufacturer is telling you not to wash the sweater because you risk shrinking it, which is exactly what you want to do. Perfect! Actually, you’ll technically be fulling, not felting, but whatever. Here is a great write-up of the process. Not having my own washer and dryer, I first attempted to save $3 per load by alternately boiling my sweaters and plunging them into cold water. The internet claimed that this would work, but the internet, as we all know, is a liar. A washer (set to hot), a little bit of soap, and a dryer worked much, much better for me, although some stubborn sweaters never did felt well.
I started with three sweaters: two shades of gray and a lovely turquoise that I’d previously felted and chopped up for another project.


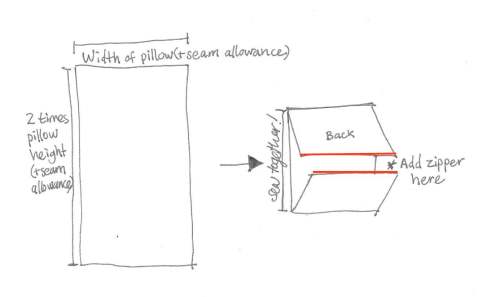
2. After you’ve felted your sweaters, cut them up. If it’s large enough relative to your pillow form, you can just cut matching squares for the front and back of the pillow from the front and back of one sweater. Otherwise you’ll need to do some patchwork to get properly sized pieces. I actually sewed together pieces from two gray sweaters to form the body of my pillow. Here’s a diagram of my pillow set-up.
3. Now here’s a fun part: come up with an applique design. A simple silhouette will be easiest, especially for your first attempt.* Cut out your design from another felted sweater.
*Advice that I myself did not heed. Each piece of the houndstooth pattern is simple, but placing and pinning them all was not.


4. Pin your design piece, whatever it may be, to your pillow front and sew it in place with a straight stitch along the edges. I recommend using a ball-point needle made for knits, but I bet you can get away with using a universal needle if you’re so inclined.


5. If you want to get fancy, zigzag around the edges of your applique piece. Since the wool is felted it shouldn’t unravel, so this step is technically unnecessary. I think it makes the design look more finished, however.

6. Sew in your zipper, if you’re using one. I put mine in the middle of the back, but you could also do a side zipper. Or buttons instead or no fastener at all. You get the idea.

7. With right sides together, sew up the sides, turn the pillow right side out through the zipper, and stuff it with your pillow form. Zip it closed and enjoy!
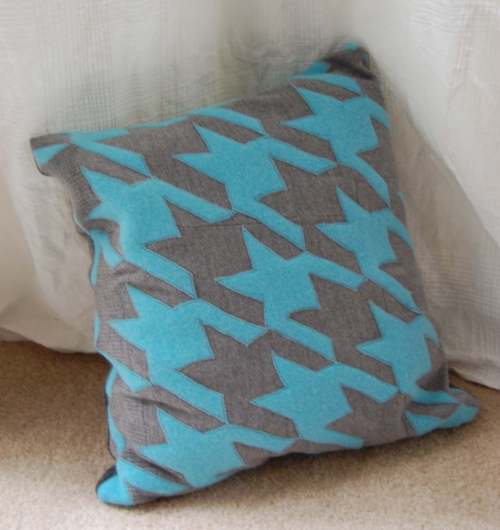
Results:

P.S. I made the other pillow in that photo, too! No tutorial for that one, though.
Looking for more tutorials and DIY projects? Check out my DIY Projects page!


Thank you so much for sharing this. I’d like to try my hand at pillows, this is a great help!
chimpsgomoo, I’d love to see any pillows that you end up making. Good luck!
This is fabulous!! I love the oversized houndstooth! I posted a link to your tutorial on Craft Gossip Sewing:
http://sewing.craftgossip.com/tutorial-houndstooth-pillow-from-felted-sweaters/2009/10/18/
–Anne
Glad you like it, Anne, and thanks for the link to the tutorial!
such a good idea! the pillow really looks great! I love it. thanks for sharing your idea and your tutorial.
best wishes from Austria!
Love this!!!