
This is one of those projects that I really meant to do before my trip to Paris, but I just didn’t get around to it. Since I have no international trips on my horizon right now I considered putting it on the back-burner, but now it’s done and my passport is all ready for my next adventure.
The big advantage of a passport cover is that it adds pockets so that you can keep a couple of little things (like your boarding pass, perhaps) securely tucked in with your passport. Plus it looks cute and makes you a little bit more mysterious to onlookers when you whip out your ID–who knows what country you’re from?
Materials:
Leather scraps (You could also make it with vinyl or felt–anything pretty substantial that won’t ravel will work.)
Thread
Scissors
Sewing machine
Leather needle
Non-stick sewing machine foot (optional)
Bulldog clips
Methods:
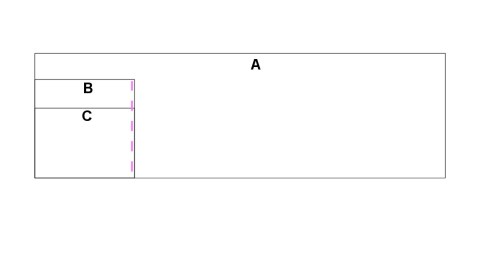
1. Cut out three pieces for your cover. The measurements for mine are for a US passport, so adjust accordingly if necessary. I’m going to call them A, B, and C. A is the body and B and C are the pockets.
A: 32 cm by 13.5 cm
B: 8.5 cm by 10.5 cm
C: 8.5 cm by 7 cm


2. On the right side of the leather, align the 8.5 cm edge of pocket B along the long edge of the body of the passport (A), and align the 10.5 cm edge of B along the short edge of A. Hold the pieces in place with the bulldog clips. You’re basically making a tall pocket. Sew a straight line 5 cm up from the bottom of both. See the diagram.

I have it folded here, but at this step it should actually be flat like the diagram.


Unfolded correctly here, with my library card to help give you a better idea of what’s going on.
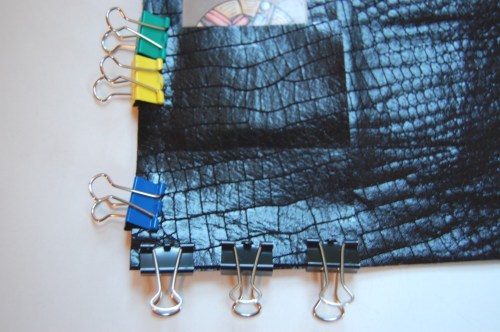
3. Align the pocket C with the bottom edge of pocket B and clip it to hold it in place. Sew along the right edge of pockets B and C, sewing through all three layers.
4. Fold piece A so that pockets B and C are on the interior and so there is a 8.5 cm-wide pocket to hold one side of the passport, and a 4.7 cm-wide pocket to hold the other side. Clip everything in place, then sew around the perimeter of piece A with a 1/8-inch seam allowance (0.5 cm, but my sewing machine isn’t metric).


5. Slip in your passport, and you’re good to go!


Looking for more tutorials and DIY projects? Check out my Tutorials page!


Nice idea! Thanks for letting me know about iDye – I’ll have to track their products down.
Great one!!!!