
Lately I’ve been on the hunt for the perfect wedding shoes. One of my first stops was BHLDN, and though I didn’t find any contenders for the shoes of my dreams, I did come across this DIY inspiration.
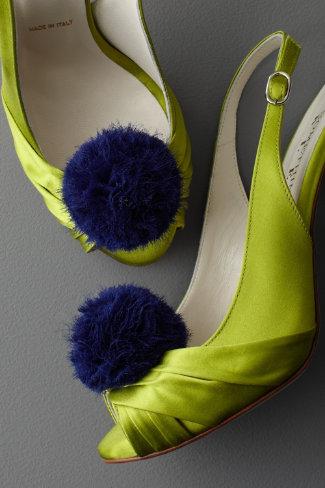
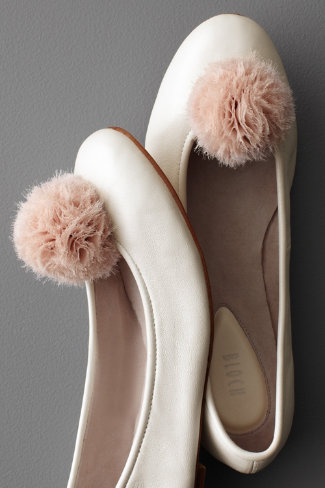
Aren’t they cute? They want $25 for a pair of shoe clips, but you can make them for far, far less. Wouldn’t it be fun to make matching ones with your bridesmaids? The fabric pompoms also lend themselves well to hairclips.
Materials:
Lightweight fabric
Fabric scissors
Regular scissors
Shoe clips (Etsy is a good source)
Felt
Glue (I used E-6000)
Lightweight cardboard, like the kind from a cereal box
Tapestry/yarn needle (optional)
Bulldog clips (optional)
Methods:
1. Print out the pompom template, cut out the size you want, and trace it twice onto a piece of lightweight cardboard. Cut out two donuts. For the shoe clips I made the small size, but I think the medium would be cute, too.

Click for the full-size image, save, and print actual-size.

2. Take your fabric and cut a strip perpendicular to the selvage (the edge that doesn’t fray) about a quarter of an inch wide by a few inches long.

3. Grab this strip and rip all the way to the end of your fabric. You’ll end up with a slightly distressed strip of fabric, but that’s what you want. Repeat. For a small pompom, it took about 5 strips of 30 inches each, or about 4 yards total. The medium size took about twice as much yardage, and although I didn’t make the large, I’m guessing it would take twice as much as the medium.


4. Place your two donuts back-to-back and start wrapping fabric strips through the hole. Especially for the smallest size, it helps to slip the end of the fabric through a tapestry needle and use that to feed it through the center hole.


5. Ready a scrap of fabric about 5 inches long. Once you’ve wrapped your cardboard template until the hole in the center is nearly obscured, hold the template in the center and slip your scissors under the fabric at the edges. Clip the fabric, remembering to hold tightly. You may only be able to cut a few layers at a time, but that’s okay, just gradually work through them all.


6. Grab that 5-inch scrap, slide it between the two cardboard templates, and tie it as tightly as you can around the pompoms.


7. Remove the cardboard and trim up your pompoms until they’re nice and even.
8. Now glue your pompoms to the top side of the shoe clip, and glue a small piece of felt on the bottom, sandwiching the shoe clip in the middle. If you have one, you can use a bulldog clip to press everything together and help the glue hold, or you can just put a heavy book on top. Let dry.

9. Clip to your shoes!

Like this post? Subscribe to my RSS feed!


Holy crap! I’ve done this with yarn but never thought to do it with fabric! It makes them so sophisticated!
I know, right? Such a different look than with yarn!
Well done Rachel, very nice work.
Thanks!
Those are SUPER cute! Great job, I love that color combo. Thanks for the how-to, I’ll be linking.
Thanks so much for this tutorial! I’ve been eyeing those BHLDN shoe clips for a couple months, and now I can make them on my own in any color I choose!
Chris, you’re welcome! Now you can go pom-crazy 🙂
Bellissimo !
Grazie !
Thanks, Sabrina!
These are so cute!
Thanks, Alicia!
So glad you did a tutorial for these!! I’m going to try it with silk chiffon cut on the bias. I feel like this is a stupid question, but, does each wrapped sandwich make one pom pom or two? After you tie between the cardboard pieces (genius!), do you fold the puffs together and glue the tied part down? Just making sure…
Thanks again, this is awesome–I will be sure to link to your blog when I make mine!
Adventures in Dressmaking: Sorry for being a bit unclear. I can see how it’s confusing. I think you already figured it out, but each wrapped sandwich makes just one pom pom, and after you tie between the cardboard and remove it you don’t need to glue the puffs together, you can just knot the tie tightly and it should hold. Hope this helps!
Great tutorial, i and any women like it… thanks…