When I started this project I envisioned a hybrid of this and this belt, and I think that’s pretty close to what I achieved.
Materials:
Leather (I used a recycled thrift store jacket)
Fabric (less than 1/4 of a yard)
3-inch wide belt backing
1-inch buckles (2)
Sewing machine
Leather needle
Iron
Leather punch (optional, but it helps a lot!)
Ruler
Bulldog clips
Some notes about sewing leather or vinyl:
It is essential to use a leather needle! Your stitches will look like crap if you don’t. Also, it helps a lot to use a teflon-coated sewing foot on vinyl, although I’m not sure how necessary it is on leather.
Remember that if you make a mistake on leather or vinyl, there’s no getting rid of the needle holes, so sew carefully! Practice on scraps first to get the hang of sewing with these materials, especially if you’ve never used them before. Don’t hesitate to walk the needle around curves to ensure you get a straight line. You can’t pin leather in place, so I use bulldog clips to hold everything together while I’m sewing.
Methods:
1. Cut a piece of belt backing about 3 inches shorter than your actual waist measurement. So if your waist measures 27 inches, cut your belt backing to 24 inches.

2. Cut a piece of leather to the same dimensions as your belt backing.
3. Cut a piece of fabric 1.5 inches wider and 1.5 inches longer than your belt backing.

4. Fold over and iron a generous 1/4 inch hem on the edges of your fabric.

5. Create a stack, with your fabric on the outside (right side out), then the belt backing, and finally the leather on the inside (right side out). Fold the edges of the fabric over the leather and sew around the perimeter, encasing the raw fabric edges.


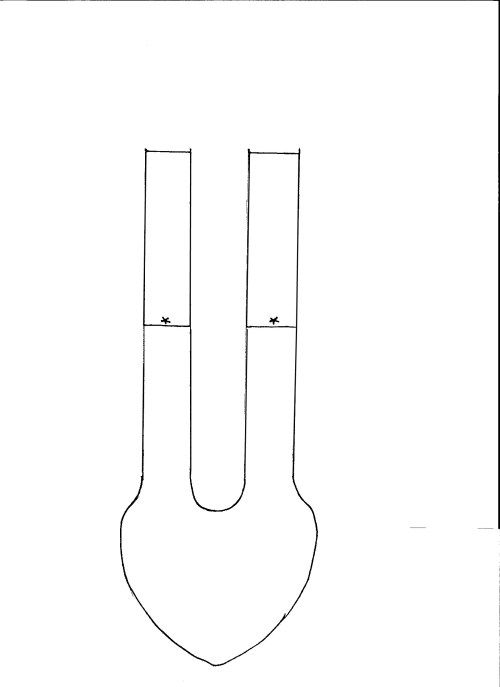
6. Set aside your fabric-covered belt and get out your leather. Print out the strap template at actual size. Trace and cut out two pieces that have straps the full length, and two that have shorter straps that only extend to the starred line.
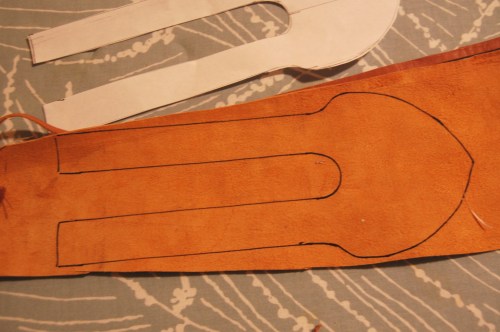

(Don’t worry if your dimensions look different–I changed the strap sizes after I took this photo.)
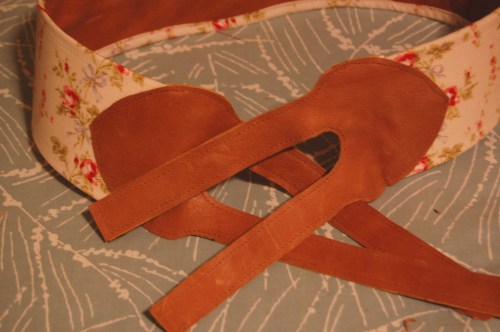
7. Sandwich the end of your fabric belt between two corresponding pieces of the leather strap piece. Hold everything in place with bulldog clips.

(This photo is from my first unsatisfactory attempt at this project. I forgot to take a new one of this step.)
8. Sew together the leather layers.
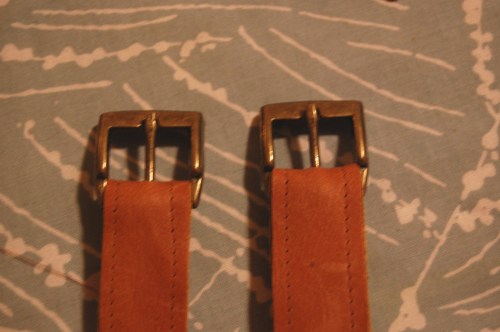
9. Take the shorter straps and punch a hole 1.25 inches from the ends. Put the buckle stick (surely there’s another name, but I don’t know it) through the hole and position the buckle. Fold the ends of the strap down and sew.

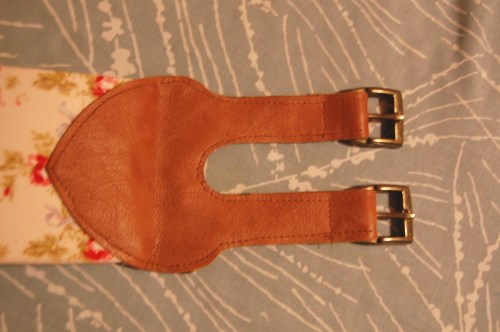
10. Cut two pieces of leather 2.75 inches by 0.5 inches. Wrap these around your leather strap below the buckle and hand sew a few stitches on the back of the loop.


11. On the longer set of straps, punch holes for your buckle. I did five sets of holes, an inch apart.

12. Wear your belt with pride!


Looking for more tutorials and DIY projects? Check out my DIY Projects page!



wow that looks awesome! unfortunately, i’m one of those people that if you tell me how hard a project is going to be before i start it, i might *not* ever attempt it. i can imagine all the amazing iterations you’ll be able to make with this belt pattern though.
Thanks Mai!
It’s not actually that hard to make, especially since I’ve worked out the kinks for you. It just takes awhile compared to some of the other projects I’ve posted on here. I am actually considering making another one today because I have a feeling it’ll come together way faster when I’m not taking photos of the process. If you have the tools and materials, give it a try!
That looks so, so fabulous. Thanks tons for the how-to, I’ll be linking.
I love it! Thanks for the tutorial, it’s bookmarked already: I saw a similar belt on somebody the other day and was wondering if I’d be brave enough to use the leather from my old boots to make one. I think I might now!
Ana, go for it! And let me know how it turns out 🙂
So cute! You make it look too easy. I wish my machine had enough umph to sew through leather. So jealous!
Thanks Jenny! Maybe your sewing machine could make it through some thinner leather? I know mine can’t handle the really heavy stuff, either.
Rachel, This belt is amazingly cool! I can’t believe you made it. The leather straps are beautiful.
Thanks, both Andreas!
Sister Andrea, I didn’t know you read my blog.
Other Andrea, your blog party sounds cool; I’ll check it out!
Excellent tutorial. Love that belt!
I have a weekly Thursday blog party especially for people to share things they’ve made to be worn. Stop by if you’d like! It is called Make It Wear It and I host it at TheTrainToCrazy.com
I love this belt! Thanks for sharing. 🙂
Thera
http://therajoyce.blogspot.com
Thanks, Thera!
what a fantastic and very stylish belt.
thanks for this tutorial.
i’m linking.
doro.
I love the belt. I’ll have to try it sometime soon. I also think it’s called a tongue. The buckle tongue. At least that’s always how I’ve heard it.
Ah, the tongue! That makes sense. Thanks Sarah!
Do you think that maybe if you used different fabric instead of leather it would still be cute?
Desiree, I think you’d have to hem the fabric and add interfacing or some of the belt backing to make the straps thick and sturdy enough. It could definitely still be cute, it would just be a different look. Good luck if you decide to try it!
I love this!! Thanks for the tutorial. I’m definitely adding it to my to do list. ♥
ooo!! <3 <3 <3 i love this! you are so talented!!
Thanks so much!