
As rain drizzled outside my window, I sat sewing these butter-yellow scalloped shorts that just scream “Spring” and wondered when I’ll have a chance to wear them. Soon, I hope, because they’ve been on my mind ever since I saw Chloe Sevigny going wild for Chloe scallops earlier this year.
 Image from elle.com
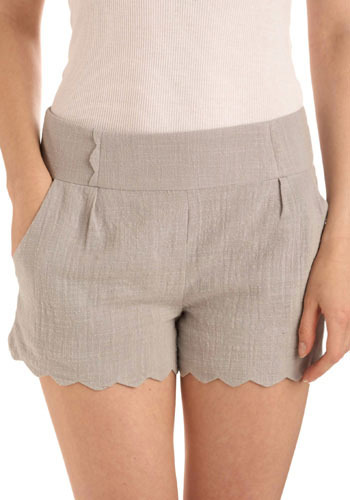
Since then many knock-offs have appeared, with both Urban Outfitters and ModCloth carrying scalloped shorts with varying similarity to the Chloe pair. And I’d be remiss if I didn’t mention the scalloped short round-up that Erin of calivintage did recently.
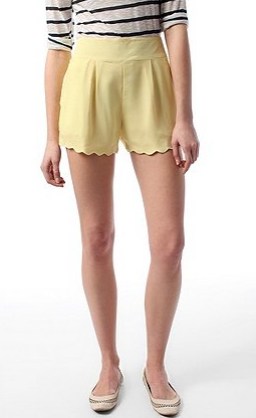
Of course my brain, seeing these shorts, says, “Hmph, I can make those!” and so after digging up a suitable surgery victim at Thrift Town, I spent a rainy afternoon doing just that.
Materials:
Long shorts of a lightweight material (i.e., not denim or twill. Mine are a slinky polyester blend)
Freezer paper
Cardstock or paperboard
Tailor’s chalk
Pen/pencil
Ruler
Sewing machine
Needle
Thread
Scissors
Note: I cannot take credit for the clever freezer paper template idea. That goes to this very helpful scallops tutorial from Threads magazine. For more help with fabric scallops also check out this tutorial.
Methods

1. Put on your shorts and decide how much shorter you want to make them. You’ll lose about 1/4 of an inch for seam allowance, and the scallops will make them hem look even shorter, so keep this in mind when deciding how much to cut.
2. Measure and mark your cut line, then pin the front and back edges together and carefully cut your piece off. This will be your facing. If your shorts aren’t long enough to provide facing material you can always use other fabric, but try to match the weight of the shorts fabric.


3. Now it’s time for a tiny bit of math. Lay your shorts flat and measure across the bottom opening. Decide how many scallops you want and divide the bottom opening by this number to get the width of each scallop. For example, the bottom opening on mine was 33 cm, divided by 8 scallops is 4.125 cm. Doing the measurements in cm is easier than inches.
4. Make a template for your scallops using a piece of cardstock or paperboard (mine is a bit of an old cereal box from my recycling bin). With a ruler, draw a straight line the width of your scallops. Find a circular item of approximately this diameter. Spice jar lids, spools, prescription bottles, etc., are all good options. Place the circular item on your line and trace around it to create a shallow semicircle, then cut out this shape.

5. Cut a strip of freezer paper a few inches wide and 2 times the width of your shorts opening. So since the opening of my shorts was 33 cm on one side, I cut my freezer paper 66 inches so that it was long enough to go around both the back and front. Matte side up, draw a line on the freezer paper and mark out the width of the scallops. Using your template, trace the scallops between these lines.


6. Cut out the strip of scallops, and with the shiny side down, iron the freezer paper onto the right side of the facing (the hem you cut off) with the apex of the curves about 1/4 inch from the cut side of the strip.


7. Pin the facing strip to the shorts, right sides together and cut edges aligned.


8. With your machine set to small stitches, sew the scallops along the freezer paper template. Try not to sew over the freezer paper, but if you catch it a little that’s okay.


9. Peel the freezer paper off and clip and trim the hell out of your seams! Especially between the scallops, you need to cut as close as possible to the stitches, otherwise you’ll end up with puckering.


10. Repeat steps 5-10 with the other leg. Unfortunately you can’t reuse the same freezer paper template, so you’ll have to cut another.
11. Turn your scallops right side out and iron. A dose of steam helps set the shape when you’ve coaxed them into nice scallops.

12. Tack up your facing with 4 evenly-spaced tacks per leg.

13. Wait for the rain to stop.


Looking for more tutorials and DIY projects? Check out my What I Made page!


This is AMAZING! And the peach color you chose is so perfect.
Thanks Catie!
Those are so cute! I agree with Catie, I love the shorts you chose! Thanks so much, I’ll be linking.
Great idea! I hope you stop by tomorrow and link up to Make It Wear It at TheTrainToCrazy.com!
Thanks Andrea!
Just found this site and already have fallen in love with multiple tutorials! You are great!
Oh, Jocelyn, thank you! It’s comments like yours that inspire me to make more tutorials.
Hi Rachel! Absolutely loved this tutorial when I saw it a while ago, completely forgot to let you know that I had linked it – bad blogger! You did a great job, love it! Can’t wait to see more of your work. x
Geneva, don’t worry, I don’t think that makes you a bad blogger. In fact, I think you’re such a good blogger that I added you to my links. Thanks for the inspiration!
Kudos, Rachel! If I had a sewing machine and the time or patience, I would definitely attempt this. 🙂
Amazing!! Thanks for this tutorial!
Glad you like it!
you have a thrift town too? I live in daytona beach FL and thats my fav thrift store