

A few weeks after I made my last DIY copper plant stand/side table, I was driving home and spotted what looked like a tangle of copper pipe on the curb in front of a nearby house. The house was for sale a couple of months ago, and then the for-sale sign disappeared, and the new owner apparently began gutting it. Occasionally small piles of free items will appear on the curb, but most of them haven’t interested me. This time, though, I parked and immediately went over to inspect what I hoped wasn’t a mirage. It was just as I hoped–someone had pulled several feet of 1/2-inch copper pipe out of the wall, and now it was mine. Into my garage it went, to await its fate.

While waiting for inspiration to strike, I noticed that this split-leaf philodendron plant was getting a bit too squished in the corner of my breakfast nook/plant conservatory. It was ready for a roomier pot, and I thought it might also like to be raised up off the floor, closer to the windows. When I remembered that there’s a copper light fixture over the table, I realized that a DIY copper plant stand would be perfect for the room. But this is a really big plant, that needed a different type of stand than the one I’d made previously. So I got to work.
The copper light fixture in the nook (it’s this one from Rejuvenation).

I used these instructions as my starting point, but I modified the measurements to perfectly fit this Ikea plant pot, in the 9 1/2-inch size. Since it’s used, my copper pipe was pretty tarnished, and I polished it up a bit, but I left a lot of the patina because 1) I got tired of scrubbing, and 2) it gave it character, and 3) the only areas you can see it are on the legs.

DIY Copper Plant Stand
Materials
1/2-inch copper pipe – You need 62-inches total, but it doesn’t come in 6 foot lengths, so just buy a 10 feet piece.
8 1/2-inch copper tees
8 1/2-inch copper tube caps
Glue
Plant pot
Tools
Pipe/tubing cutter
Marker
Ruler or measuring tape
Rag or paper towel

Steps
1. Measure, mark, and cut your pipe with the tubing cutter.


For the same pot I used, you’ll need the following pieces:
(4) 7-inch
(4) 3 1/2-inch
(8) 2 1/2-inch

2. Assemble the inner support square as you see below, using 4 tees and 4 of the 2 1/2-inch pieces. Add the other 4 2 1/2-inches pieces, and glue everything together. Gorilla glue is activated by moisture, so I swabbed the pieces I was gluing with a wet rag right before adding the glue and putting them together.


3. Add 4 tees to the ends of the 2 1/2-inch pieces. Glue, and let the glue dry.

4. Add the 7-inch pieces and the 3 1/2-inch pieces to the tees, and glue in place. Let the glue dry.

5. Glue the copper caps onto the ends of the pipes. Let dry.

6. Add your pot and plant!


Hey Rachel, this is so great! Wondering — if i have a pot with a larger base, should i just increase the length of the pipe pieces that the pot rests on? Thanks so much!
Thanks, Emily! Yes, that’s exactly what I’d do. It might actually be a little tricky to figure out how much to lengthen those pieces for your pot, but to avoid cutting the wrong sizes, I’d mock it up. Take the tees, and roll up pieces of paper into tubes that you’ll pretend are your pipes. So let’s say you try making them three inches. Assemble your fake base, and measure across it from the end of one pipe to another, and compare that to the diameter of the base of your pot. Hope that makes sense!
I love this! It seems like for the inner support square, the piping and tee connections leave a little room when connected? You said you used a 9.5 in size pot and all the support pipe pieces are 2.5 in and it clearly accommodates your size pot! I’m trying to figure out my own dimensions for a roughly 7 in wide pot? In your opinion, would you say to cut down the inner support lengths to 2 in instead of 2.5? I can’t wait to make this!
Lauren, to figure out what size supports to make for my pot, I had to do a bit of geometry, and experimentation. The Ikea pot diameters refer to the diameter at the top of the pot, but they actually narrow toward the bottom. So the diameter of the pot where my pot stand holds it is actually about 9.25 inches.
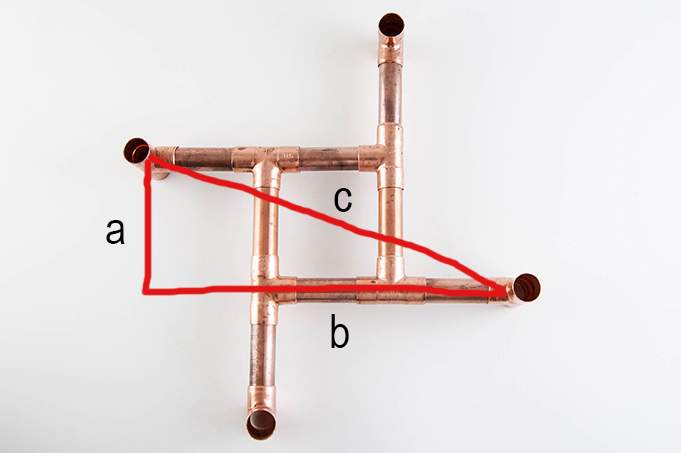
The measurement you need to know to make sure your pot will fit is the distance between two of the upright tees. I made a little diagram to help make this clear, hopefully it shows up:
So the distance you need to know is c, and if you remember from math class, a-squared + b-squared = c-squared. If we said that a=2.5 and b = 3×2.5, then solved for c, that would be 7.9 inches, which wouldn’t be big enough. But it is big enough because the tee connectors add some length. If we did it with 2 inches, 2squared + 6squared, and solve for c-squared, that’s only 6.3 inches. So it’s possible that your pot would fit due to the extra room, but it might not. What I would do is cut the pieces so that your pot would definitely fit, fit them together without glue, then cut them shorter if it’s too big. You can just cut down the four inner or four outer ones.
2 1/4-inch pieces should definitely be big enough based on 2.25squared + (3×2.25)squared =c-squared and solving for c=7.1 inches. Sorry for the math lesson, but I hope that helps!