
You guys remember the catio I was building for my cats? Here’s the inspiration that I started with, and here’s the progress. Before I went to Australia, I finished it! Well, mostly. Like 99.9%. There were a couple of tiny finishing touches I wanted to add, and I still may make a few tweaks, which is why I’m just now getting around to sharing photos. But I really am pretty happy with how it turned out, and below I’ll share some tips and resources for how to build your own catio.
More importantly, how do my cats like it? Well, one of them (Adventurous) comes out in it all the time, but mainly just to use the great outdoors as her toilet, and the other one (Delicious) has only been in it when we’ve put her in it. She has been an indoor cat her whole life though, so even going through a cat door is confusing and scary for her, and we haven’t pushed the issue because it’s currently pretty chilly outside.
We won’t be able to really judge whether the cats like their new outdoor area until spring, at the earliest. I envision them lounging in the warm spring sunshine, Delicious monitoring the squirrels in the bushes and avidly tracking the hummingbirds at the nearby feeder and jasmine vine. When I put Delicious in the catio for these photos, in between trying to figure out where she was and how to get back to the indoor warmth, her interest was caught by noises from outdoor creatures. So I’m hopeful that my dreams of the catio lifestyle will come true in the spring.
As a reminder, here’s the spot before:

And the after:
After the patio was done I added mulch, and transplanted a catmint plant and a jasmine vine from elsewhere in the yard. I painstakingly untangled the jasmine from the trellis it was already on, then wound it through the wire mesh and attached it with plant wire, so hopefully it won’t take long to take over the side of the catio.
Here’s what it looks like from inside the porch:

There’s a little door here so that we can toss the cats in without going down the stairs and around the house. Kidding about tossing, though, there’s a nice little shelf right beneath the door.

In the background you can see the hummingbird feeder on the porch that will hopefully provide Delicious with catio entertainment. She already watches them from inside the house, so I think she’ll be even more intrigued with the hummingbird HDTV. Don’t worry, I can’t imagine that there’s any way she could hurt them.
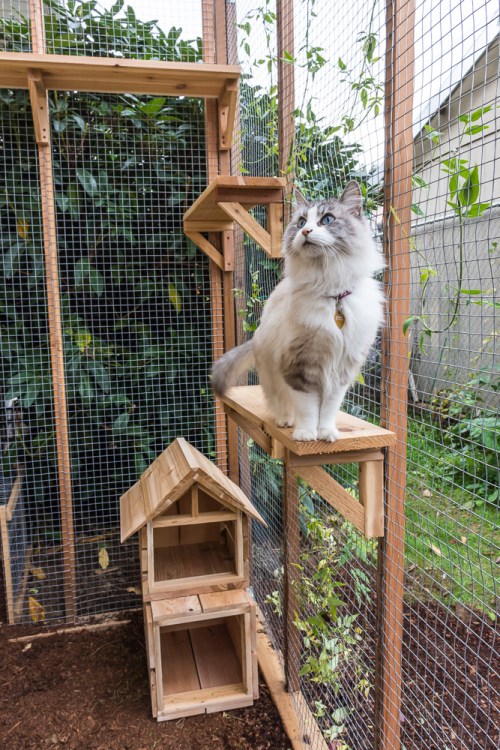
There are shelves all over the catio, to give them places to climb and perch.

You can also see the opening to the tunnel that leads to the cat door in the basement window.

There’s a shelf in the basement that they can climb up onto to go out the window. Yes, I am that weirdo who cut a tiny cat doormat out of an old ripped doormat. It was mainly because it made me laugh, but also because I thought it would help prevent dirty cat footprints on my nice white shelf I had just painted and hung.

I built this little hidey-house, too, but it was originally supposed to go on one of the shelves. Well, the full story is that the little one was supposed to go on the top shelf above, and it was going to be just a box. But when I got part-way done building it, I realized it seemed pretty small, so I decided to add a roof to make it roomier. Then after I added the roof, I realized it was too tall to fit on the upper shelves. So then I made the larger box to go on the shelves, but when I put it in the catio Steven suggested that I stack the boxes to make this two-storey cat mansion. Long story short (too late), I might make ANOTHER box like the bottom one for lounging on the shelves. We all know how cats feel about boxes, so I don’t think I can have too many.

I don’t have detailed plans or step-by-step photos of how I built this catio, since I custom-designed it to fit this space, and your space will likely be different. Also, I made lots of mistakes and had to figure things out as I went along. But I can tell you the approximate steps I took, and provide tips and advice on the materials and tools that I used. Hopefully this will be enough to help you get started if you want to build one yourself, and I’m happy to answer any questions.
Basic Catio Building Steps and Tips
First, I measured the space and drew out rough plans for a 4-foot by 8-foot structure with a roof 8-feet high against the house, sloping to 7 1/2-feet high. (Honestly I debated whether a roof was necessary, since it’s halfway under the gutter, but Steven wanted a roof, so I went with it and I’m glad I did.) I also based the plans on the 2-foot-wide wire mesh I was able to find.
Because I’m really picky about aesthetics, I wanted square wire mesh, which is a lot harder to find then mesh with rectangular holes. I tried really hard to find it locally, but ended up buying 3 rolls of this 1″x 1″ wire mesh, and I am totally happy with it. The three rolls actually weren’t enough to also cover the whole tunnel, but since most of it is behind the bush I wasn’t concerned with its looks, and used a combination of some chicken wire and other wire mesh I had in my garage.
Once I had plans, I constructed frames for the four sides out of 2x4s on the bottom and 2x2s on the tops and sides. Everything is screwed together with 2 1/2-inch screws and reinforced with right-angle hardware on the corners. The upright supports are spaced in 2-foot increments so that they could be spanned by the 2-foot-wide wire mesh I used. The sizes of the doors/openings were also based on the width of the wire mesh.

After I had built the sides, I added the wire mesh to the three not going against the house, attaching it with poultry netting staples, the kind you hammer in.
I didn’t want the wood to be sitting on damp ground, plus the ground was pretty uneven, so I marked where the walls would go, dug a trench, and laid patio bricks so that they were just above ground-level.
Placing it on top of the bricks, I attached the first side to the side of the house with screws, then added the other sides, securing them to one another with screws and mending plates.
I also screwed 2x2s to the porch-side opening, covering part of it with mesh and leaving part open for a porch access door.
Next I built the doors to fit the openings. The doors are built out of doubled 1x2s, with the wire mesh sandwiched between the two layers. Spring-loaded wire clamps were really helpful for holding the mesh in place while I screwed on the second layer of 1×2. Both doors have fence latches that can be locked with padlocks, so no one can waltz in and steal our precious darling cats.

I added the 2x2s on the roof with hardware connectors to support the roofing panels, then Steven and I cut the roofing panels with a jigsaw, and attached them to the roof supports.
To add the shelves, I built simple wood brackets out of scraps of 1x2s and 2x2s, attached them to the uprights, and cut shelves to fit from 1x6s and 1x10s. I used those just because I happened to find some at the ReBuilding Center for a bargain, although I think the wider shelves will probably be best for cat-lounging.
I think that pretty much covers it, and though it sounds simple, it took a while to build it all. It would probably take less time if you didn’t make rookie mistakes like not taking the width of the wood into account when designing the structure and roof, so try to watch out for that stuff!
The materials and tools I used are listed below, and I’d be happy to answer any questions.
Materials
Cedar 2x4s
Cedar 2x2s
Cedar 1x2s
Cedar 1x6s
Cedar 1x10s
1×1 wire mesh
Galvanized staples
Outdoor coated screws
Hinges
Gate latches
Clear corrugated plastic roofing
Right angle hardware
Hardware connectors
Gate latches
Hinges
Door pulls
Patio bricks
Tools
Hammer
Mitre saw
Jigsaw
Electric drill/screwdriver
Measuring tape
Heavy-duty wirecutters


Beautiful catio. Every cat should be so lucky!
Thank you!
This is amazing! I’m actually in the planning stages of building my own catio! I’m sure your kitties are going to love it! I did have a question, it looks like your window opens from side to side, and all of the window cat doors I’ve found are designed for vertical window openings, I just wanted to know how you installed this cat door? 🙂
Thanks so much, Amber!
So that cat door is a CatMate door that is meant to be installed in a door, and to install it in the window I fit pieces of wood around it that filled up the rest of the window opening. I can’t remember if there was a practical reason that I used multiple pieces of wood that I glued together, or if I just didn’t have one piece that was big enough. The simplest way to do it would be to cut a piece of plywood to fit the window opening, then cut out the hole for the cat door, and install it by attaching it to the wood. I recently added some foam around the edges of the window opening to help reduce drafts, too.
I hope that helps, and good luck with building your own catio!