
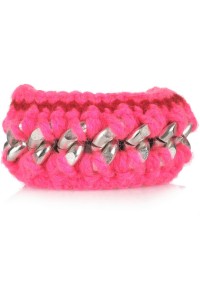
Lately I’ve seen lots of mixed-media bracelets, combining thread or yarn with metal, but this one is inspired by a very specific example. This lovely Marni bracelet was my starting point for this tutorial.
It took me a bit of experimenting to figure out how to attach the yarn to the chain. I started out trying to crochet through the chain links, then pick up those stitches with knitting needles, before I figured out the method I’ll show you below. If you know how to knit, it’s not hard at all. Plus, once you know the technique, it’s adaptable to all sorts of looks. Depending on the chain and yarn or thread you use you could come up with an endless variety of mixed-media bracelets. Just make sure that whatever yarn you pick fits through your chain links!
Materials:
Yarn (size depends on your chain)
Knitting needles (size depends on your yarn)
Tapestry/yarn needle
Scissors
Bracelet with large links OR
Chain large enough for your wrist, and clasp, plus tools for attaching clasp
Methods:

1. If you aren’t starting with a pre-made bracelet, attach a clasp to your chain.

2. Tie the yarn to the link nearest the clasp, leaving a tail several times longer than the bracelet. Thread a tapestry needle onto the end of this tail.


3. Hold your chain side-by-side with a knitting needle (size 4 for me, but it’ll depend on your yarn), with the knitting needle on top of the yarn. Wrapping the yarn around the knitting needle, thread it through the first link of your chain.


4. Repeat, keeping a consistent number of loops per chain link, until you reach the end of your bracelet. I did two per link, but you may want to do more or less depending on your yarn. Leave the last link of the chain free from yarn, and knot the yarn onto the second-to-last link.


5. Start knitting your yarn from the end attached to the ball of yarn, beginning with purl stitches. Knit the next row, then bind off the last row.


6. Repeat the above steps for the other side of the chain.


7. If you want a contrast stripe, switch to a different color for the second row, then switch back to bind off. I actually used embroidery thread for my stripe instead of yarn.


8. Weave in your ends, and if you want your bracelet to lie flat (you do, it makes a big difference and takes no time) block it.


The Marni bracelet has a black ribbon, which you could easily add but which I left off. If you can find larger bright-pink yarn you could probably make a version of this bracelet even closer to the original, but I think it’s pretty cool either way. Happy knitting!


Love it! Need it…
Thanks!
That is insanely awesome!! I suck at knitting, but will have to try it anyway!
Thank you! It really doesn’t take much knitting skill–you can do it!
Utterly clever! I love the use of knitting needles and this tutorial is a yarn stash buster!
Thank you! And yeah, it’s perfect for leftover yarn scraps, as it takes very little yarn.
very bad coping thing from other person!!
Ivon, it’s inspired by an expensive international brand that I could never afford, not a single person. And I’m not selling knockoffs, just making a similar one for my own personal enjoyment. I’m sorry you have a problem with that.
Hi,
Loooooooooved your bracelet. What do you mean by “block it”?
Rana, thank you! Blocking is something that knitters do to help a finished project take on the desired shape. For this project, all I mean is wash it with a mild soap and lie it flat to dry, maybe with something heavy on top. It helps keep the edges from curling up.
Love it!
Thank you for sharing
Wow!I’m in love with this DIY!
Maybe I can show it on my Blog?
xxx Leo, from http://loenis.blogspot.de/